mag trans (epop) [Yamada Ryosuke's part]
POSTED ON Monday, 28 January 2013 AT 02:55 \\
here :) i've done it at my LJ :) enjoy reading guys. ^^ cr the mag scan to owner. :)
HTU Winrar
POSTED ON Sunday, 20 January 2013 AT 23:19 \\
Assalamualaikum / Hello :) okay as you guys read, today i will do a tuto how to use winrar. act, i have done this together in htu textures tuto. but yeah, i guess i'll do the another one for other people know right? xD so lets go . :D
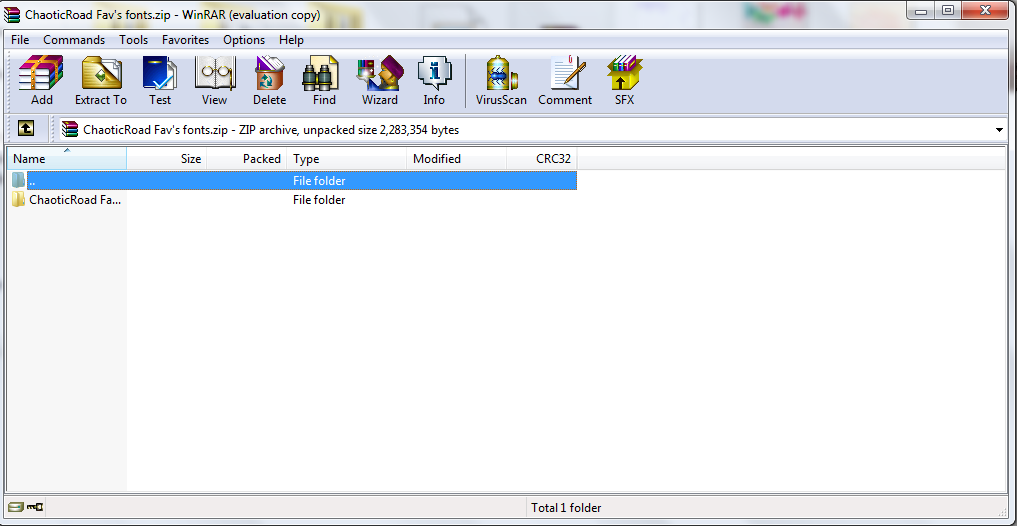
so, sometime, when you download something, you will see this thing right?
okay then you wanna open it and it will turn like this;
and you didnt know what to do right? okay so here is the solve;
first, go to your winrar file (the one where you wanna open it) , right click at the winrar file. like this;
as you can see there is an option; "EXTRACT FILES" click it. :)
then something will pop-out. like this ;
just click ok, then you will get your files. ^^ .
thats all, i hope you guys will understand and dont scared to ask me. ^^ any request or questions are kindly welcome at the cbox. ;D
Make your own brush
POSTED ON Monday, 14 January 2013 AT 01:04 \\
Assalamualaikum / Hello :) as i said, i' ll use english for any new tutorials. ^^ okay today, i'll do a tuto how to make your own brush. :) so, lets go. ^^
okay first, open your PS and set your new doct like this;
for the wisth and height, you can set it yourself as you want :) then, set your background contents as TRANSPARENT ;D
then, go to brush tool, pick any type of brushes tht you like :)
then, after you have chose your fav brush, go make any shape at the transparent doct. like this;
yeah i just do a random one xD
then, after you have satisfied with your result, go to EDIT > Define Brush Preset . like this
then, something like this will pop-out
yeah. name your own brush, then if you go back to your beushes library, you'll see your own brush there. ^^
yeah. the brush tht i used is my own brush. ;D btw, you can combined two brushes at once when you wanna make your own brush. ;D
i hope you'll get it . thank you. ;D
Make Borders [Tuto]
POSTED ON Sunday, 13 January 2013 AT 01:37 \\
Assalamualaikum / Hello ^^ okay today quick tutorial, today's tuto is how to make border at pictures. like this;
yeah ^^ i didnt use PSD for this ;) but before that, thanks to tumblr user;
hiro-mitsu for sharing abt this ^^ and i dont use any JE picts this time. i just use plain background for a clearer version for this tuto :) okay lets go;
okay first, open a new document/picture tht you want to do the border. /i recommend you to try this at a plain doct for the first attempt ^^/
then, make a new layer of the plain doct. like this;
yeah, then, go to rectangular marquee tool;
after you choose Rectangular Marquee Tool, press "CTRL+A" . then, the doct will be like this;
you can see black dots around the doct right? okay then, right click in the doct, and choose STROKE. like this;
after you choose STROKE at tht option, then a window will pop-out like this;
at tht window, you can see WIDTH & COLOR there right? okay for the width, set it as you like. ;) and you'll got the result like this;
yeah ^^ i used black color and 18 px for this :) if you just wanna like tht, then go to SELECT > DESELECT. but if you wanna do the border that look like mine (the example) read below :)
okay then, if the black dots around the doct isnt dissapear yet right? and you have 1 border right? okay then, right click again in the doct, select STROKE again, and set the WIDTH to 1 > 5 , select your fav color and then, done. ^^ like this;
its purple-ish right? yeah i used 3px for width and purple color. ^^ its outside the black border. ;D
then, you wanna delete tht black dots around right? just go SELECT > DESELECT. then, you guys can save the doct/pict ^^
this is the example tht i used this border at random pics;
there you go, CHINEN~! xD hahaha. okay anything you guys can ask at cbox okay. ^^
btw, how is the new look of this blog? :D is it okay? ><
Freebies ; Textures #2
POSTED ON Friday, 4 January 2013 AT 00:42 \\
Assalamualaikum / Hello fellas. ;) okay as i said, i'll use english language. im sorry but the older tuto(s) are in Malay. ;) okay, today im gonna give Textures again /Lol k/ for this textures, full credit to me please. :) here you go;
#1
#2
#3
thats all minna. :) arigatou ^^
mag trans (epop) [Yamada Ryosuke's part]
POSTED ON Monday, 28 January 2013 AT 02:55 \\
here :) i've done it at my LJ :) enjoy reading guys. ^^ cr the mag scan to owner. :)
HTU Winrar
POSTED ON Sunday, 20 January 2013 AT 23:19 \\
Assalamualaikum / Hello :) okay as you guys read, today i will do a tuto how to use winrar. act, i have done this together in htu textures tuto. but yeah, i guess i'll do the another one for other people know right? xD so lets go . :D
so, sometime, when you download something, you will see this thing right?
okay then you wanna open it and it will turn like this;
and you didnt know what to do right? okay so here is the solve;
first, go to your winrar file (the one where you wanna open it) , right click at the winrar file. like this;
as you can see there is an option; "EXTRACT FILES" click it. :)
then something will pop-out. like this ;
just click ok, then you will get your files. ^^ .
thats all, i hope you guys will understand and dont scared to ask me. ^^ any request or questions are kindly welcome at the cbox. ;D
Make your own brush
POSTED ON Monday, 14 January 2013 AT 01:04 \\
Assalamualaikum / Hello :) as i said, i' ll use english for any new tutorials. ^^ okay today, i'll do a tuto how to make your own brush. :) so, lets go. ^^
okay first, open your PS and set your new doct like this;
for the wisth and height, you can set it yourself as you want :) then, set your background contents as TRANSPARENT ;D
then, go to brush tool, pick any type of brushes tht you like :)
then, after you have chose your fav brush, go make any shape at the transparent doct. like this;
yeah i just do a random one xD
then, after you have satisfied with your result, go to EDIT > Define Brush Preset . like this
then, something like this will pop-out
yeah. name your own brush, then if you go back to your beushes library, you'll see your own brush there. ^^
yeah. the brush tht i used is my own brush. ;D btw, you can combined two brushes at once when you wanna make your own brush. ;D
i hope you'll get it . thank you. ;D
Make Borders [Tuto]
POSTED ON Sunday, 13 January 2013 AT 01:37 \\
Assalamualaikum / Hello ^^ okay today quick tutorial, today's tuto is how to make border at pictures. like this;
yeah ^^ i didnt use PSD for this ;) but before that, thanks to tumblr user;
hiro-mitsu for sharing abt this ^^ and i dont use any JE picts this time. i just use plain background for a clearer version for this tuto :) okay lets go;
okay first, open a new document/picture tht you want to do the border. /i recommend you to try this at a plain doct for the first attempt ^^/
then, make a new layer of the plain doct. like this;
yeah, then, go to rectangular marquee tool;
after you choose Rectangular Marquee Tool, press "CTRL+A" . then, the doct will be like this;
you can see black dots around the doct right? okay then, right click in the doct, and choose STROKE. like this;
after you choose STROKE at tht option, then a window will pop-out like this;
at tht window, you can see WIDTH & COLOR there right? okay for the width, set it as you like. ;) and you'll got the result like this;
yeah ^^ i used black color and 18 px for this :) if you just wanna like tht, then go to SELECT > DESELECT. but if you wanna do the border that look like mine (the example) read below :)
okay then, if the black dots around the doct isnt dissapear yet right? and you have 1 border right? okay then, right click again in the doct, select STROKE again, and set the WIDTH to 1 > 5 , select your fav color and then, done. ^^ like this;
its purple-ish right? yeah i used 3px for width and purple color. ^^ its outside the black border. ;D
then, you wanna delete tht black dots around right? just go SELECT > DESELECT. then, you guys can save the doct/pict ^^
this is the example tht i used this border at random pics;
there you go, CHINEN~! xD hahaha. okay anything you guys can ask at cbox okay. ^^
btw, how is the new look of this blog? :D is it okay? ><
Freebies ; Textures #2
POSTED ON Friday, 4 January 2013 AT 00:42 \\
Assalamualaikum / Hello fellas. ;) okay as i said, i'll use english language. im sorry but the older tuto(s) are in Malay. ;) okay, today im gonna give Textures again /Lol k/ for this textures, full credit to me please. :) here you go;
#1
#2
#3
thats all minna. :) arigatou ^^
rainy martini

weirdo from Malaysia.
just call me syarifah
i love rabbits
Jpop fan since late 2011
love those Johnny's shits
soon-be-lesbo cause of dat 48 family
current obsession; "Im only swim freestyle"
hates everything including myself
tried so hard to be a good person
but failed all the time
im nice w/ anybody.
^ - total lies
yoroshiku.
You can visit my:
tumblr \
twitter \
livejournal \
affiliates
monthly archives