Screencap meme w/ temp tutorial
POSTED ON Sunday, 23 March 2014 AT 23:32 \\
Hellloooo i know its been ages since i post new tuto i know i know im such a bad blogger uwu
so apparently, i've edit a simple graphic for my friend's birthday and she ask me how i do it so im being nice and do it for her. yay lets start!
oh btw this is how the graphic looks like;
okay lets start with a different pics and caps
1. i use this template for this graphics but if you want to do a single picture is also fine . its up to you :)
*credit to welovetemplates :D
2. open a new doct set the size as shown (to make it easier the pic to fit the template)
kinda like this;
the go screencap anything you like :D
3. edit yr pic, crop, add psd, sharpen, etc
4. after that choose any colour you want (its better if the colour suit with caps) then pick brush tool, colour the whole caps except the person/thing you want to keep like this;
kinda like that. then save it :D
5. open the pict back then drag it to your template!
like this ;
do the same thing for others then you done! :3
thats all! :DD ask anything if you want anything :3
tips; for transparent pic, its better to save it via png rather than jpeg. ^ -^)/
How to edit topaz-like effect (w/out plugins)
POSTED ON Saturday, 31 August 2013 AT 03:46 \\
Assalamualaikum // Hello :D its been a while since im here uhuuu sorry guys ;w; so today im gonna do a tutorial of -like the i said at the title- thing. :3 lets get started :D
so, open yr picture,
then duplicate it. after you duplicate it, go to filter>stylize and set it up liddis;
after that, set the opacity - 90 and the fill - 30
then, flatten the duplicate-d layer.
after you flatten it, duplicate the pict again.
go to filter>blur>gaussian blur> set the radius 3.5 pixels
and you should get the pict kinda like this;
then set into lighten, with opacity 30.
the result kinda like this;
after that go to smart sharpen, and set it like this;
* for me, you can play with the radius. like 0.3 // 0.2 sometimes the pict works on 0.2 and sometimes it works on 0.3 up to you :)
then you got yr pict with the topaz-like-effect-without-topaz clean-effect xD
you can add psd if you want~~ :DD
this is my final pict after adding actions and psd~ :D
dont hesistate to talk to me if you anything tht you dont understand~ :D
How to put a pict in a shape
POSTED ON Saturday, 27 July 2013 AT 00:18 \\
Assalamualaikum // Hello ~~ ^^ its been a long time ne, xD gomen :3 so today, i want make a tuto how to fit a pic in a various shape like this;
something like that :) i think there are more simplest or other way but i'll use what i know okay? its simple ^^ okay lets get started;
first, open a new document, with yr own fav widthXheight . i just use 700-750. but 500 also fine.
after that, set a new layer by clicking this; /that button at the bottom. then you'll get the other layer like at the top that i've coloured.
then, select the pen tool. for making it easy, i will recommend you to use freeform pen tool. because you can make yr fav shape easily.
then, make yr shape on that layer, like this;
its depends on you what shape you wanted to do :) so after you finished draw yr shape, right click and select MAKE SELECTION. ;
it will pop-out a window and just click okay. and it will appear with a dotted-lines. something like this;
yeah then select paint bucket tool and fill the shape with the colour that you like. after that do ctrl+D . it will make yr dotted-line lost and yeah you'll get something like this;
lets go to the best part;
open yr pict, edit it first if you want, add some psd or something else, and after you finished it, put the picture on the layer; liddis
yeah. after that, right click on tht pict and select "create slipping mask"
and voila~! you'll get yr picture in that shape. like this;
and dont worry, if you want to change the position of the pict also can. select ctrl+T and adjust yr pict.
something like this;
yes, and there you go. pict in various shapes ^^ i've done a same. like this; but a simple shape;
that's all. please dont hesitate to ask me questions ^^
How to use "Action"
POSTED ON Friday, 26 April 2013 AT 01:51 \\
Assalamualaikum // Hello everyone ^^ hisashiburi da yo ne :/ okay to day i want to make a tuto of how to use Action on yr pictures :)
first, like ususal, ope da ps :) then open yr pic.
after that, you need to download Action first. i recommend you to visit;
Action files are usually like this;
so you dont have to be panic. the file is not broken. its just like that :)
back to ps, find this button at yr ps;
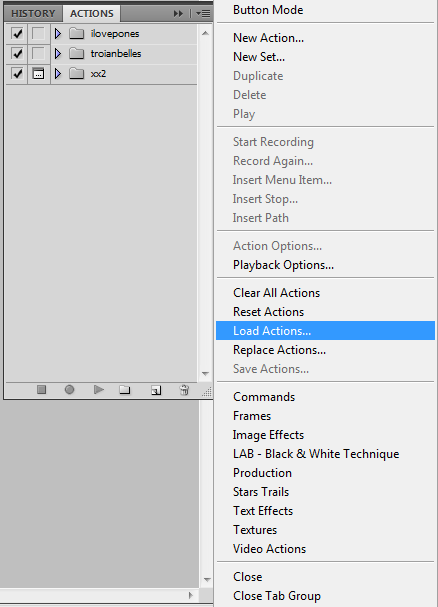
then, click it. after that, you'll see a box will come out. liddis;
then you'll see at the top, at the very right side, an option button right? click it ^^
then you can see the "blue" at the Load Action right? xD click it and choose your Action file :)
after you've chose it, at the box, you'll see something liddis;
that's the action file. :) now, see the pict below. i'll tell the further. but its "kinda" complicated(?) okay ;)
you see the blue arrow right? click it and you'll see many options under it right? like this;
first, you can see the big red box that i've "marked" at it .
you need to click at the first option of the Action.
based on the above,i've clicked at that "blue" thing
then, if you see at the below, you see the little red box right?
with the "play" button :)
click the play button so the Action command can start ! ^^
this is the result of before and after using Actions ;
you can see the difference right? yes it have been more sharpen :D
dont hesitate to ask me if you have doubt in anything! ^^
1 year ♥
POSTED ON Friday, 12 April 2013 AT 01:12 \\
hello ~^^ okay, on 24 February, its been a year since i know Hey! Say! JUMP ^^ here you go i will do little speech. *muntah rainbow* xD
Hello :) since i ever know Hey! Say! JUMP , i had a colourful life with the presence of JUMP. JUMP had teached me abt how precious your friends are and more. they also lead me to know more abt Japan. for short, if its not because of JUMP, i guess i will just give up to japan and go listen to english songs. :3
JUMP made me laugh, happy, sad (their speech ofc T^T at the con), and more. with JUMP, i can brag abt them to my friends. ;)
their songs are also so good ! ^^ like Super Delicate, Beat Line, Arigatou, Tsunagu Te To Te and etc. JUMP members also a multi-talented artist. Yuto play drums, Keito play guitar, Hika play Bass, Yamada play saxo, Inoo play keyboard. JUMP Band :3
and of course, i love the members. :)
Yabu Kota; the un-official leader. the big brother of JUMP, always take care all of JUMP members, the smiling prince, the husband of queen Kei, keke xD
Takaki Yuya; ultimate Bakaki. the most baka in JUMP. always being kakkoi, yet so baka. the elder member in JUMP but he have that childish personality. ;3
Inoo Kei; the Queen of JUMP :) well, he is a pretty boy, thats why xD, the one and only Architect in JUMP, kinda have that sharp tounge behaviour. but its not too much, Keyboard player in JUMP band x)
Yaotome Hikaru; the jokester in JUMP, Yabu's second wife. LOL. the bass player in JUMP band, a shy yet cutie person. he is so hawt in blonde.
Arioka Daiki; the cutie chubby penguin. have the sunshine smile. always being told that his face doesnt suit his age.
Yamada Ryosuke; the most center-ed person :) the saxophone player, "he have the good looking face, but he is so stupid" -- Yaotome Hikaru to Yamada ^^
Chinen Yuri; the JUMP's brain, the most athletic in JUMP, the shortest yet the cutest /fan-gir-lin/
Okamoto Keito; the guitar player, being called gorilla but the most narcissistic. have the kakkoi-type face but one of the kindest ^^
Nakajima Yuto; the drummer, being paired w/ yabu and called Twin Tower, always cheerful, and he does tap dancing ;)
the members always bring smile to the JUMPers. but, i will always remember this person;
Morimoto Ryutaro; the hamster baby. :'3 the youngest in JUMP, stop from JUMP on 2011, but still, FOREVER EXIST IN JUMP.
because,
#forever 10 JUMP
yes :) that's why :)
i hope, Hey! Say! JUMP will get a brighter and good success in their future,
thank you for teaching me everything that somehow, i would never realize
thank you for debut back in 2007.
thank you for make people smile.
thank you for singing for us, JUMPers,
thank you for Everything :)
ずつと 10 人 JUMP ♥
[TUMBLR] Pages
POSTED ON Saturday, 16 March 2013 AT 00:58 \\
Assalamualaikum // Hello ;)
long time no see huh? well, im quite busy. :3 gomen ne >< okay okay today, i wil special tuto for tumblr user.
when you applied a theme at tumblr, they just give a few links to put right? maximum-ly, they will put 6.
for me, i have a lot of tags that i want to put at my tumblr.
so, i have the solution for it~ ;D
you need to a page, to put your links. liddis;
you can see i put a lot of links there ;D so here i will tell how to do it;
first, tumblr > customize.
then when you scroll down, you can see this;
after that, click the "pages" option.
you can see * + Add a page* there, click it ;)
after you click it, a new window, will pop-out. something liddis;
1. PAGE URL ; you need to put yr URL there. its up to you. for me, i just put it a simple word; "etc" xD
2. PAGE TITLE ; this is the title of the page. i put "Ikemen+Kirei+Paradise" as my page title :)
3. BODY ; okay now, put any words there, like this;
you can see those words right? after that, highlight it, then click the "link" button there. based on the pic above, its the 4th option frm right :) if you want to put the link, you need to put it liddis;
http://www.yourtumblrurl.tumblr.com/tagged/*yourtag*
yes like that ~ :) after you have finished all your tag links, click the create page and done ;D
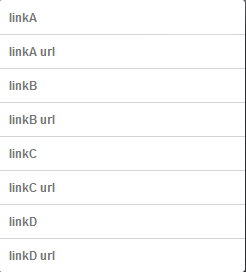
after that, scroll up a bit, to this section;
okay, as example, you want to put yr page link at Link A.
LinkA: the name of your link
linkA url; put yr page url. :)
save, and its done~! :D
hope this will helped and your work will end w/ success ne. :3 if it turn bad, dont shy to ask me~ :D
GIF tuto (Bonus)
POSTED ON Monday, 18 February 2013 AT 00:58 \\
Assalamualaikum & Hello ~! :D okay, before this, i made a tuto gif right? okay, somehow i forgot to tell what i use to make it LOL okay just read the below k~ :3
1. Sharpen , Unsharp Mask, Smart Sharpen
okay, when im editing gif, usually i will use those three. it will make your gif kinda sharp, HQ and better. ;)
for unsharp mask, its depends on you how much do you want to set the amount and the radius. usually, i will use this setting;
for Smart Sharpen, i recommend to use this setting ;
;)
2. Surface Blur .
sometimes, when you sharpen too much, the result will be kinda worse right? so, i use Surface Blur to cover it. ;) and when you use the Surface Blur, make sure to adjust your treshold. or else, it will end up like cartoon-ish pict. ;) for me, i recommend the threshold frm 1 > 20 only. ;)
3. Vibrance
then, sometimes, your gif color doesnt like too bright or wtv it calls, so, to make the color better, i use Vibrance. ;)
this vibrance settings also up to you. sometimes i use 80 , 70 or 90 ;)
4. Re-Size the GIF
then, after you finished yr gif, its too big right? so, re-size it by;
Image > Image Size.
usually, im setting my image size is 500 ;)
5. Crop
to reduce the size of the GIF, i usually crop the un-wanted part. yeah.
just select the frame and layer, then crop it. ;)
yeah. thats what i used when making my gifs. ;) queations are welcomed, and hopefully this will help you~! ^^
GIF tuto
POSTED ON Thursday, 14 February 2013 AT 20:28 \\
Assalamualaikum / Hello :) okay actually someone asked me how do i edit my gifs. well, my gifs are not that good. but yeah. its not wrong right.....? *^* okay, lets start ;)
1. burst capture. via VLC Media Player
first, i burst capture it at VLC. you guys can use GOM too. but i prefer more VLC ^^
2. after i burst capture-d, open it at PICTURE. here;
then you can find yr pict there ;)
3. open it via Photoshop.
*need to know how to do basic gif making* okay after you opened it, reverse frames etc,
then i'll start to sharpen each frame. but you need to click both frame and layers to sharpen it. like this;
then, Filter > Sharpen . i like to use Unsharp Mask + Sharpen + Smart Sharpen. ;)
sharpen it with every frames. then my gif will be like this;
(I use Sharpen > Unsharp Mask > Smart Sharpen > Surface)
then i set every frames for 0.02 seconds. since its kinda too fast, so i make it slow a bit.
then its up to you. you can add vibrance, PSD, text and anything else. ^^ thats how i do my gifs. ;D here you go. the final result;
anything you can ask me. ^^ thank you for reading! ;D hope your work will end with success! ;D
rainy martini

weirdo from Malaysia.
just call me syarifah
i love rabbits
Jpop fan since late 2011
love those Johnny's shits
soon-be-lesbo cause of dat 48 family
current obsession; "Im only swim freestyle"
hates everything including myself
tried so hard to be a good person
but failed all the time
im nice w/ anybody.
^ - total lies
yoroshiku.
You can visit my:
tumblr \
twitter \
livejournal \
affiliates
monthly archives